Skiing tips and exercises to help anyone carve like a pro.
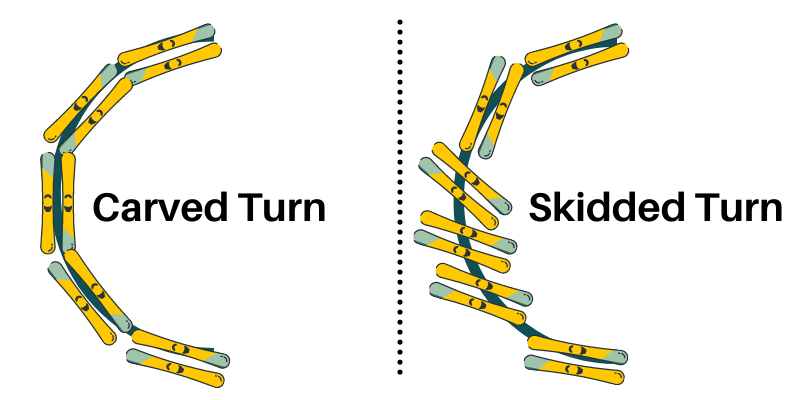
Carving is especially helpful in icy or steep terrain, and is essential for taking your skiing to the next level. The goal of learning to carve is to stay on the edges of your skis as you round the turn, and to avoid skidding through your turns. This helps your skis grip the snow, allowing you to ski faster, smoother, and more confidently on varied terrain.
Ski exercises or drills can help you notice and improve things in your form. These exercises can help you learn to carve on the mountain.
What is carving?
Carving is engaging the edge of your skis to grip the snow, and guide your turns based on the radius of your ski, with as little skidding as possible between turns. A ski with a wide radius is designed for making longer, straighter turns, and a ski with a shorter radius is designed for faster, shorter turns, and would typically be used for an event like slalom.
Most all-mountain skis have a medium radius, not too long or too short, for making medium radius turns. Check out the Evo video below to learn more about how the radius of your ski affects how you turn.
Exercises for Learning to Carve
When carving, you want to be in an athletic stance with your feet just a bit wider than hip-width apart, and pay attention to your overall skiing posture. Here are a couple exercises to help you start carving!
Railroad Tracks
If you are just starting out with learning to carve, it may be helpful to feel what it is like to have your skis on edge, and feel your skis turn on their radius. It is best to do this drill on wide, flat terrain, so you don’t get going too fast or risk a collision!
Start out going straight, and then turn both your skis onto one of their edges. To do this, push down with your big toe on one foot and your little toe on the other, or roll your knees and ankles in the direction you would like to turn.
Do not force the turn– simply get on edge, and feel how that makes the ski move. After passing over the fall line in one direction, switch to the opposite edge and do the same! There is more to carving than just switching from edge to edge, but this is a helpful exercise to get used to engaging your edges while skiing and feeling what happens when you put your skis on edge.
Baby Steps
For this exercise, I would recommend starting on an intermediate or steeper beginner slope. It is a simple, but effective exercise for training yourself to ski on your edges with as little skidding as possible.
Start skiing as normal. But, while skiing, make little baby steps across the hill and while you are turning. You can’t really skid if you are stepping, so this drill essentially forces you to carve.
Be aware of your posture while doing this drill. Focusing on stepping can be distracting and lead to a detriment in your overall form. While stepping, try to also pay attention to your skis transition from one edge, to flat, to the other edge through the various stages of your turn.
This can also help you learn to stay in the front seat—important when beginning to carve.
This drill can also make skiing a bit more strenuous as you are adding constant movement. A good way to help get your blood pumping a little extra on cold days!
Bunny hops are a variation on this drill where instead of doing little steps as you ski, you do little hops. This has a similar effect of making skidding very difficult, and is a bit more cardio-intensive.
Outside Ski
This exercise helps you practice weight distribution when you’re carving. If you try to carve and your weight is not properly distributed, you will tip over. When carving, most of your weight should be on your outside ski– if you are turning towards the left, this would be your right ski, and vice versa.
For this exercise, lift up your inside ski while completing each turn with 100% of your weight on your outside ski. When you hit the fall line after completing that turn, switch feet so that you once again complete the next turn entirely on your outside ski.
This drill can be done on any terrain, but you want it to be at a level you are comfortable with. However, you do not want to try this on terrain that is too flat, as some momentum will help with balancing on one ski.
The Teapot or Heisman Drill
In this exercise, you can leave your ski poles on the rack. While skiing, you will have one hand on your hip, and the other pointed upwards and forwards in the direction you are moving, resembling a tea-pot, or for football fans, a Heisman trophy.
If you start out with a turn to the left, you should have your right hand on your hip and your left arm extended out towards the left. You should try to push your hip into the hill with your right hand, and feel how your skis go onto their left edges as you round the turn.
When you have passed the fall line after your left turn, switch the position of your hands so that your left hand is on your hip and your right hand is extended out towards the right.
The goal of this exercise is to notice where your hips are and how the position and movement of your hips drive your ski onto its edge.
You should also feel a bend between your upper body and lower body. Your upper body stays perpendicular to the ground to balance you, while your lower body leans towards the hill with your skis.
This exercise also helps with upper-lower body separation which is essential to carving.
J-Turns
A fun exercise for a not-so-busy day at the mountain, this drill is best for wide trails with not much traffic. J-Turns test how far the edge of your ski will carry you, and let you practice really driving into the turn.
Start out moving straight down the fall line. Then, begin your turn in your desired direction by getting on edge. Keep turning in that direction by really leaning into the turn. Do not allow yourself to skid at all, similar to railroad tracks. Keep turning until you are facing up the hill.
Then, turn around however you would like to. Repeat in the opposite direction. See how tight of a “J” you can make by leaning into your ski edge.
It does help to have a bit of speed going into a J turn. You want plenty of room to extend your turn wide enough to complete the ski radius. That is why this move is best reserved for less-crowded days at the mountains and on longer, wider trails.
Final Thoughts on Learning to Carve
Have fun learning to carve! Remember to focus on your posture while doing any of these exercises, as it will make them a lot easier!
Check out the Youtube video on carving, below, for some more advice on learning to carve.